Showing posts with label kyc verification. Show all posts

Thursday, November 22, 2018

How to verify your bet365 account?

The quickest way to verify your documents is to upload these via the Know Your Customer section of the website, where you will also find guidance on our KYC requirements and how to complete the verification process.

We will aim to review your documents within 48 hours. Once the review is complete we will notify you by email.

If you have any difficulties uploading your documents via the Know Your Customer section, please Contact Us.

At first, Log in to your bet365 account. You will see a pop-up message.


* Click to enlarge the image

Click the ''Verify Now'' button. Then you will be redirected to a new window should like this one...


* Click to enlarge the image

Step 1:

* Upload your identity Document


* Click to enlarge the image

Click the "Upload your identity document" button.


* Click to enlarge the image

Here you can choose any options what you prefer (Passport/ID Card/Driving Licence). But for now, I am using "Upload Passport" option to go to the next step.


* Click to enlarge the image

Click "Choose file". Another window will pop-up to select the passport image.


* Click to enlarge the image

* For our safety, we blur the image. Click "Open".
Then click on the "Confirm" button.


* Click to enlarge the image

Did you notice that? A confirmation message showing the display. It means your document is currently being reviewed by one of their advisors.


* Click to enlarge the image

Step 2:

After completing Step 1. It's time to jump into the step 2. Now we are going to use "Upload Your Supporting Documentation" option.


* Click to enlarge the image

Click the "Upload Your Supporting Documentation" bar.


* Click to enlarge the image

Click "Submit" button. A window will pop up.


* Click to enlarge the image

Click "Upload files". Another window will pop up. Select your desired image. Then click the "Open" button.


* Click to enlarge the image

Click "Continue" to complete the step 2 verification.


* Click to enlarge the image

A confirmation message showing the display. It means your document is currently being reviewed by one of their advisors.

That's it. I hope you done it. For further assistance, you can contact us!

How to verify Skrill account and increase limits?

Increasing your limits is usually a matter of providing additional account verifications which is quick and easy.

Once you have started using your account to make transactions, you will be given the option to provide an additional verification of your identity, by uploading a clear, legible, valid and unaltered scanned colour copy or photo of one of the following documents:

    •    The front and back of your driving license
    •    The photo page of your passport
    •    Front and back of your national ID card
    •    Address verification document
    •    Face match/selfie picture of your ID

Fund Account

Funding your Skrill account is part of the verification process. You can complete the verification of your account ONLY after a successful funding. You can fund your Skrill account by using any of upload options available in the Deposit section of your account or by receiving money from other Skrill customer or merchant.

You can start the process of uploading a copy of your photo identification documents by clicking on the banner, visible after you login to your Skrill wallet or via the Settings section of your account, under Verification.


* Click to enlarge the image

This will take you to Verify your Account page where all remaining verification steps will be displayed.

Verify Id

You can choose to verify your account via your Facebook profile or to follow the standard verification flow.


* Click to enlarge the image

Once you start the Verify ID process, you will be presented with 3 options allowing you to complete the ID verification:


* Click to enlarge the image

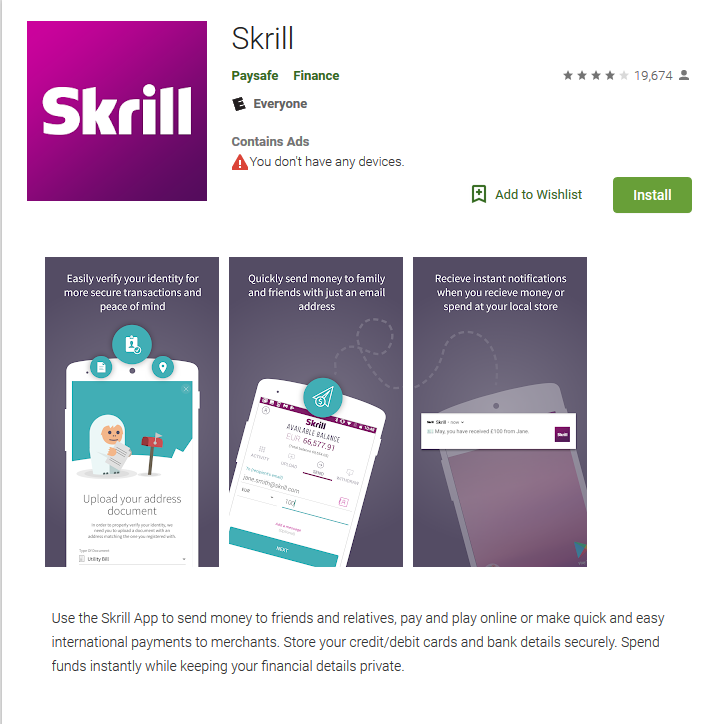
    1. Download our Mobile App – this is the fastest option allowing you to download our app and use your phone camera to take photos and upload them to our secure verification system. You can download the Skrill application (Skrill Google Play/Skrill Apple App Store) and use your smartphone camera in order to easily complete this verification step.


* Click to enlarge the image

    2. Use Webcam – this is a fast option allowing you to use your webcam to capture images of the front and back of your ID, as well as a selfie.

By clicking on Capture Webcam Photos you will be given the option to choose your document type and country of issuance.

Note: The country of issuance will be preselected based on your country of registration. If your ID document is issued by another country, please select it from the drop-down menu. Failure to change to the correct country may cause upload error.


* Click to enlarge the image

At this point, you will be required to use your webcam to capture a new copy of your document and a selfie, which we will use to verify your identity.


* Click to enlarge the image

If you do not see the auto pop-up message to share your camera in your browser, you can find information on how to re-enable it here.


* Click to enlarge the image

Then you will see a confirmation screen saying that your documents have been successfully received.


* Click to enlarge the image

After successfully using your webcam or to submit an image of your ID and face/selfie, both the Verify Your ID and the Verify Account Ownership steps will be IN REVIEW. You will then receive a success message and can continue to any remaining verification steps.


* Click to enlarge the image

Once the documents are successfully processed you will receive an email and the Verify Your ID and the Verify Account Ownership steps will show as COMPLETED.

    3. Upload ID and Picture of ID next to face – this is a slow option allowing you to upload photos of your front and back of your ID and an image of you holding your ID next to your face.

By clicking on this verification option you can choose between:

    -taking pictures with your camera under Capture image with your device camera (please refer to point 2)

    -uploading files from your device under Upload file from your device


* Click to enlarge the image

When uploading a picture of yourself holding your ID next to your face you will be able to preview the images by clicking on the file name after loading. You can also upload multiple files if required at this time.

Verify Address

If you have not yet shared your browser location, you will be prompted to do it to fulfill the Verify your address requirement.


* Click to enlarge the image

The geolocation service is available for selected countries only. If your country is not supported, we'll give you the chance to manually upload an address verification document.


* Click to enlarge the image

Summary

On the summary page you will see that certain steps have been completed and that the submitted documents are being reviewed.


* Click to enlarge the image

Once the verification process is fully completed you will receive an email confirmation.


(Collected from skrill official site)

How do I take my first steps with Skrill?

Starting to use Skrill is easy. You only need to provide your name, email and password and you can register a Skrill account. No further information will be required from you until you initiate a deposit or receive funds in your Skrill account.

Deposit

When you initiate of your first deposit, you will be required to provide a minimum personal information that will help us to proceed with your deposit and set up your Skrill wallet features.

The details that you need to provide upon your first deposit attempt are the following:

    - your country of residence

    - the currency of your Skrill wallet

    - your address

    - your city of residence

    - your postal code

    - your date of birth

Once you submit this information, you will have full access to all Skrill wallet features.

Receive money

The option to receive money is available for all Skrill customers.

When you receive funds from another Skrill customer or merchant, an email will be sent to you informing you that a payment has been made. To claim the funds, you will need to log into your Skrill account with the email to which you have received the notification. You will then be required to submit the information as listed above. This will give you access to the sent funds and to the rest of the Skrill wallet features.

Note: Once you submit the details as listed above, the funds will be automatically credited into your Skrill account. You will receive the money in the currency that you have chosen regardless of the currency of the payment. If, for example, another Skrill customer send you funds in USD, but you choose as a currency of your wallet EUR, the received amount will be credited in EUR and a currency conversion fee* of 3,99% will be applied.

In Skrill, the security of your wallet is our priority. For that, we require additional security measures and verifications.

Login

Once you complete your profile information (as explained above) and in order to protect your Skrill account security, you will be asked to set up the 2-Factor authentication option or to create a PIN.

Verification

Once you make your first successful deposit or receive funds in your Skrill wallet, the option to verify your account will become available for you. Although the account verification option will be presented to you, you do not need to verify your identity until you start actively using your Skrill account. You can use your account to send or receive funds up to a limited amount before you are required to verify your details.

* If your Skrill account is in a currency other than the currency of the transaction, an additional 3.99% Foreign Exchange is added to our wholesale exchange rates.

Wednesday, November 21, 2018

What is two-step authentication and how to use it?

1. What is two-step authentication?

Two Step Authentication is an added security measure available on your account. It provides an additional layer of security to your account by requiring a code from your smartphone to be entered along with your email and password. The code then is used to sign in to your NETELLER Account or on a merchant cashier page in place of the Secure ID.

Note: Two-step authentication is not available for Windows Phone.

2. How do I enable two-step authentication?

    1. In your NETELLER Account click on Settings and then on Security.

    2. In the Two-step authentication section click on Enable.


    * Click to enlarge the image

    3. If you have not previously entered your Secure ID in the current session, you will be required to enter it before continuing the flow. If you cannot remember your Secure ID, you can click the Reset Secure ID button.

    4. Select your device from the list of supported devices, click Continue and follow the on-screen instructions for your specific device.


    * Click to enlarge the image

    5. Install the Google Authenticator app from the Apple app store or Google Play store on your phone.

    6. Scan the QR barcode displayed to you on the setup screen.

    7. Enter the 6-digit authentication code generated by the Authenticator app. and click on Continue.

Note: Blackberry users cannot scan a barcode and must follow the manual entry instructions.

3. I cannot scan the barcode while setting up the two-step authentication. What should I do?

If you are having trouble scanning the barcode, you can enter the code manually to successfully setup your device by click on Can’t scan the barcode? and follow the instructions.

Note: Blackberry users will be directly presented with instructions on how to setup their device manually.


    * Click to enlarge the image

4. How do I the use two-step authentication?

    1. Go to https://member.neteller.com and sign into the member’s account by entering your email/account ID and your password.

    2. Open your Google Authenticator app on your device in order to obtain an authentication code.

    3. Enter the unique one-time authentication code generated by your mobile application into the Authentication code field and click on Verify code.


    * Click to enlarge the image

Note: If any portion of your sign in attempt is incorrect - including the Two-step authentication code - you will be returned to the sign in form and presented with the standard error message of: "Some of the information you have entered is incorrect.". Then you will be required to re-enter ALL sign-in credentials at this point.

5. How to use NETELLER at a merchant site (cashier page)?

    1. Initiate your transaction on the merchant site as usual.

    2. Where the merchant asks for your NETELLER Secure ID, you will now be required to enter your unique one-time authentication code generated by your mobile application.

    3. Use the Google Authenticator app on your mobile device to generate this authentication code.

    4. Enter the code in the space that asks for your NETELLER Secure ID.

6. What is a trusted device and how do I use it?

Trusted Devices are devices that you can request to remember during the authentication process. Setting a device as trusted allows you to sign into your NETELLER account from that device without being required to complete a security check. To set a device as trusted, you need to select the Trust this device option on the login page. Next time you sign into your NETELLER account from this device, you will not need to pass any additional security check.

7. How can I remove a device?

The Trusted Devices section will only appear in your NETELLER account if you have set up a device as trusted. To remove a device, follow the steps bellow:

    1. On the Settings section from your NETELLER account, click on Security.

    2. Click on Remove next to the device you would like to remove.


    * Click to enlarge the image

    3.A pop-up window asking you to confirm the removal will appear. Click on Yes in order to confirm the action.

8. My phone was lost or stolen. What should I do?

If your phone has been lost or stolen, you will need to contact us to help you disable two-step authentication. To do so click on the available contact channel below.

9. I deleted the account on the Google Authenticator app. What should I do?

All devices allow the owner to remove accounts from the Google Authenticator. Removing an account on a user's device does NOT mean that two-step authentication has been disabled on the NETELLER Account.

If you have removed your NETELLER Account from your device and attempt to sign in to your NETELLER account, you will still be challenged with the two-step authentication code. If this happens, you will need to contact us by clicking on the available contact channel below.

10. How do I disable two-step authentication from my NETELLER Account?

    1. On the Settings section from your NETELLER account, click on Security.

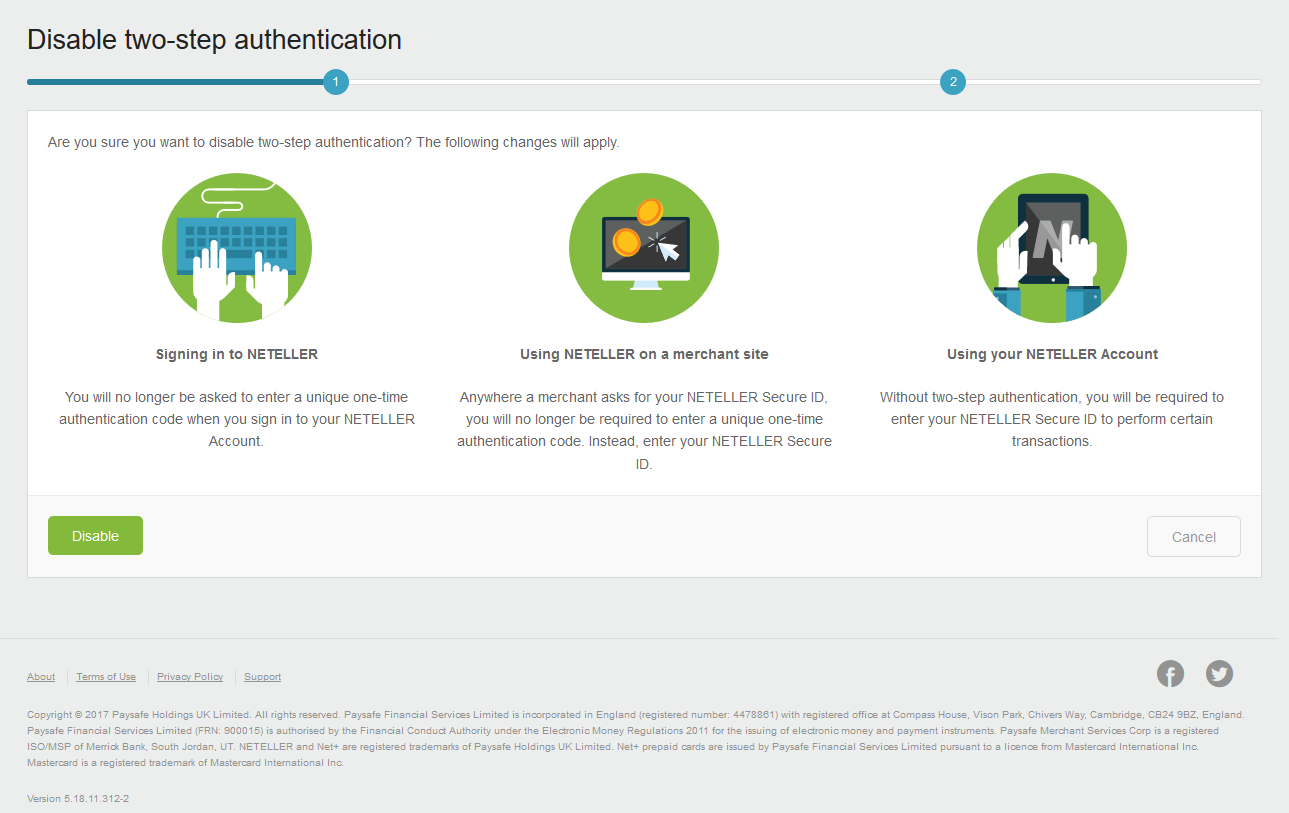
    2. Click on Disable into the Two-step authentication section.

    3.A screen asking you to confirm your action will appear. Click on Disable to finalize the process.


 * Click to enlarge the image

Once you have disabled the two-step authentication, you will be presented with the option to reset your Secure ID. We recommend you to do so in order to be able to continue making transactions within your NETELLER account.

What is Secure ID and how to reset it?

The Secure ID is a 6-digit number assigned to you by NETELLER for additional security. No one within NETELLER can see your Secure ID. Please ensure you never share your Secure ID with anyone, except to enter it when transferring funds to and from merchant websites or upon login as part of the Security check. 

In specific cases where your account security may have been compromised, a new 6-digit Secure ID can be generated. If you change to a new NETELLER Account, your old Secure ID will no longer be valid.

Note: If you have activated the two-step authentication, you need to use the code generated by the Google Authenticator app instead of the Secure ID.

In order to reset your Secure ID, you should follow the steps bellow:

1. Click on the Account section of your NETELLER account. *
2. In the Account Overview section click on Reset (next to Secure ID).
3. Once you click on Reset, an email with a link allowing you to reset your Secure ID will be sent to the email registered in your NETELLER account. Please note that the link is valid 24h. 
4. When you click on the provided link, you will be redirected to a NETELLER page allowing you to reset your Secure ID. You have two options:

  • To create your own Secure ID – for security reasons your Secure ID must not be a single repeating digit (111111) or six consecutive numbers (123456). We recommend that you do not use your date of birth in your Secure ID.
  • To obtain an automatically generated Secure ID – click on Generate random.

5. Once the new Secure Id is confirmed, click on Save.  

*You can also reset your Secure ID by clicking on Security in the Settings section in your NETELLER account. 

Please note that for security reasons, your Secure ID is reset automatically once a year.


(collected from neteller official site)

Saturday, November 17, 2018

How to open a neteller account?

At first, you have to go to Neteller official website (Click here). When opening a new account make sure to check the website is secure or not!
It redirects to a new page in new tab. The image will look like this.


* Click to enlarge the image

Fill the gaps with original information. Don't use fake information. If you do so then the Neteller account will not be verified.

Well done, finally you make it. Let's jump into the next step. Just click here.

Friday, November 16, 2018

How can I verify my NETELLER Account?

Well verifying your identity with NETELLER will not only ensure the security of your account but you will have access to higher limits and other deposit options. You will also be able to apply for the Net+ Prepaid Mastercard®*.
Once you have started using your account to make transactions, you will be given the option to provide an additional verification of your identity, by uploading a clear, legible, valid and unaltered scanned color copy or photo of one of the following documents:
The front and back of your driving license
The photo page of your passport
Front and back of your national ID card
Address verification document
Face match/selfie picture of your ID
You can start the process of uploading a copy of your photo identification documents by clicking on the blue banner, visible after you login to your NETELLER account.


* Click to enlarge the image

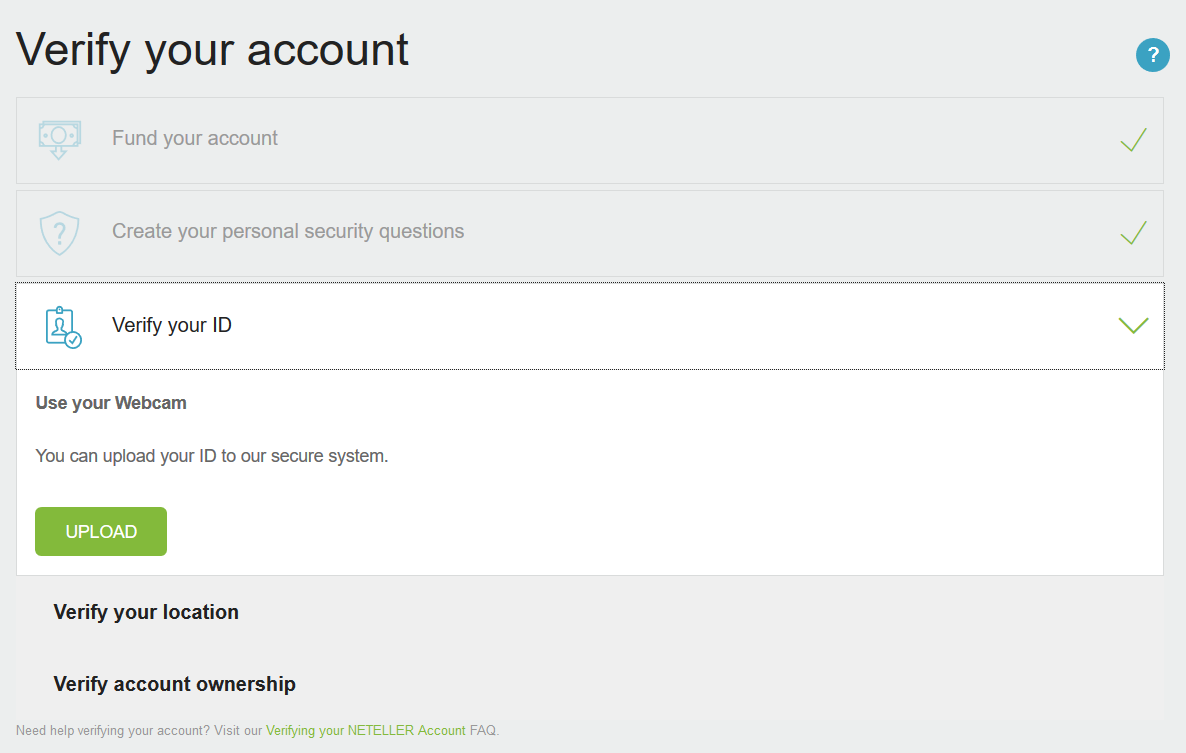
This will take you to the Verify your account page where all remaining verification steps will be displayed.


* Click to enlarge the image

Step 1:  Fund your account and Create your personal security questions

To start the verification process, you should fund your NETELLER account and create your security questions.
Once the security questions created, you will have the possibility to enable the two-step authentication by clicking on Enable two-step authentication. If you do not wish to do so at the moment, you can simply click on No thank you in order to continue with the verification process.

Step 2: Verify you ID

By clicking on Upload, you will have the possibility to upload your ID to our secure system by using your webcam. If you don’t have a webcam on your computer, you can download the NETELLER application (NETELLER Apple App Store/NETELLER Google Play) and use your smartphone camera in order to easily complete this verification step.


* Click to enlarge the image

In order to successfully complete the verification process, you will need to allow the pop-ups in your browser.
Now you will be prompted to enable your Webcam or download the NETELLER Mobile App to initiate a face match/selfie picture of your ID.


* Click to enlarge the image

Choose the type of document you would like to provide, fill up the required information and then click on Verify.
Note: If your document has no expiry date, please check the space next to No expiry. You need to click on the Allow button in the upper left corner of the page in order to be able to continue.
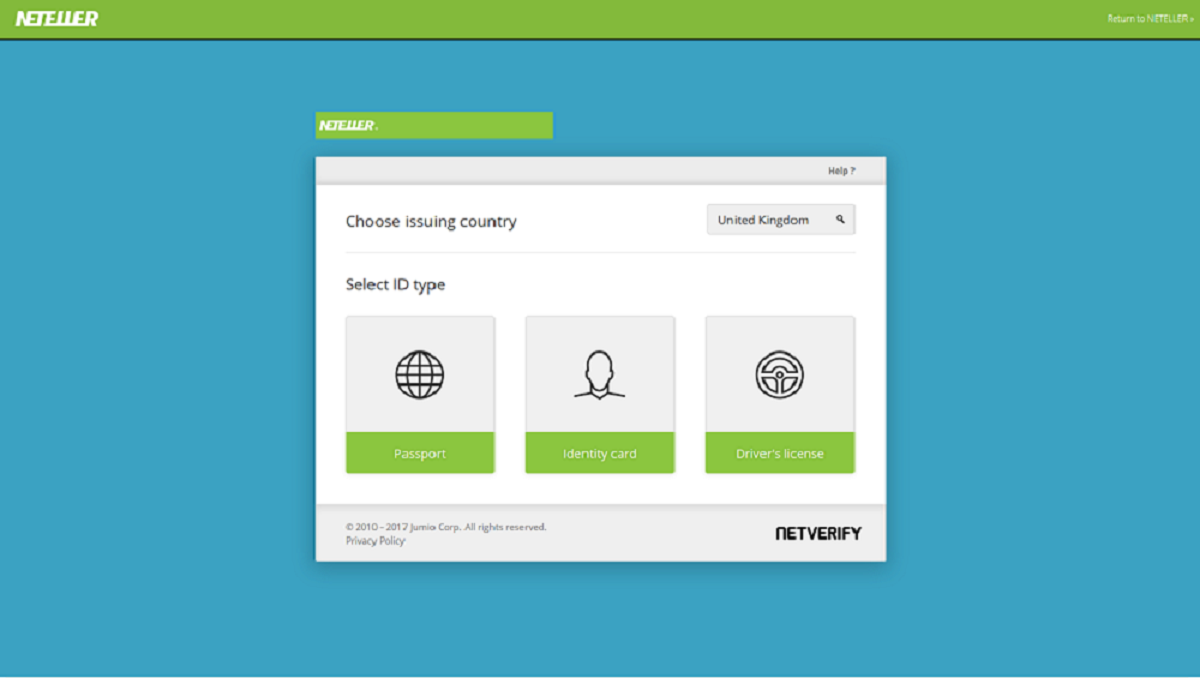
By clicking on Verify you will be given the option to choose your document type and country of issuance.
Note: The issuing country will be preselected based on your country of registration. If your ID document is issued by another country, please selected it from the drop-down menu. Failure to change to the correct country may cause upload error.


* Click to enlarge the image

At this point you will be required to use your webcam to capture a new copy of your document and a selfie, which we will use to verify your identity.


* Click to enlarge the image

If you do not see the auto pop-up message to share your camera in your browser, you can find information on how to re-enable it here.


* Click to enlarge the image

Then you will see a confirmation screen saying that your image quality is being verified.


* Click to enlarge the image

After successfully using your webcam or the mobile app to submit an image of your ID and face/selfie, both the Verify your ID and the Verify account ownership steps will be IN REVIEW.
Once the documents are successfully processed you will receive an email and the Verify your ID and the Verify account ownership steps will show as COMPLETED.

Step 3: Verify your location

If you have previously shared your browser location, the Verify your location step may automatically be completed, if you are logging in from your registered NETELLER address.
If you have not yet shared your browser location, you will have to do so in order to fulfill the Verify your location requirement. Detailed information on how to enable location sharing on your browser you can obtain by clicking here.


* Click to enlarge the image

Depending on your country of residence it might not be possible to verify your address via geolocation sharing even if you are at your registered NETELLER address. In this case, you will be asked to manually upload an address verification document.


* Click to enlarge the image

Step 4: Verify your ownership

If you have previously uploaded a copy of your government issued ID and a selfie/facematch of yourself to verify your ID, the Verify your ownership step may automatically be completed.
If you have not yet completed this requirement, you will be prompted to do so by using your webcam. (Please see section Verify you ID)


* Click to enlarge the image

If you do not see the auto pop-up message to share your camera in your browser, you can find information on how to re-enable it here.
Once the verification process is fully completed you will get a message in your NETELLER account stating that your account has been upgrade and you will receive an email confirmation to your registered email address.


* Click to enlarge the image

For further information you can contact with me. Just click here.
(collected from neteller official site)

Featured Post

How to verify your bet365 account?

The quickest way to verify your documents is to upload these via the Know Your Customer section of the website, where you will also find g...

Popular